What is a School Calendar and How YearMap Works
What YearMap is and how it works
Looking for an overview first? Visit our school calendar generator or academic calendar generator page to see how YearMap helps UK schools create academic calendars with term dates, INSET days, bank holidays, PDF export and ICS export.
YearMap is an academic calendar management tool built for UK educational institutions. It allows school staff to build a structured academic calendar, assign dates to categories such as INSET days and school holidays, calculate pupil days, and generate a printable PDF and importable ICS file, all from a simple five-step wizard.
Every calendar you create is stored securely in your account area and can optionally be shared with colleagues at the same institution.
Signing In
SSO authentication via your institution
YearMap uses Single Sign-On (SSO) through your institution's Google Workspace or Microsoft 365 account. No password is stored by YearMap itself.
Account Settings
Configure your school defaults before creating calendars
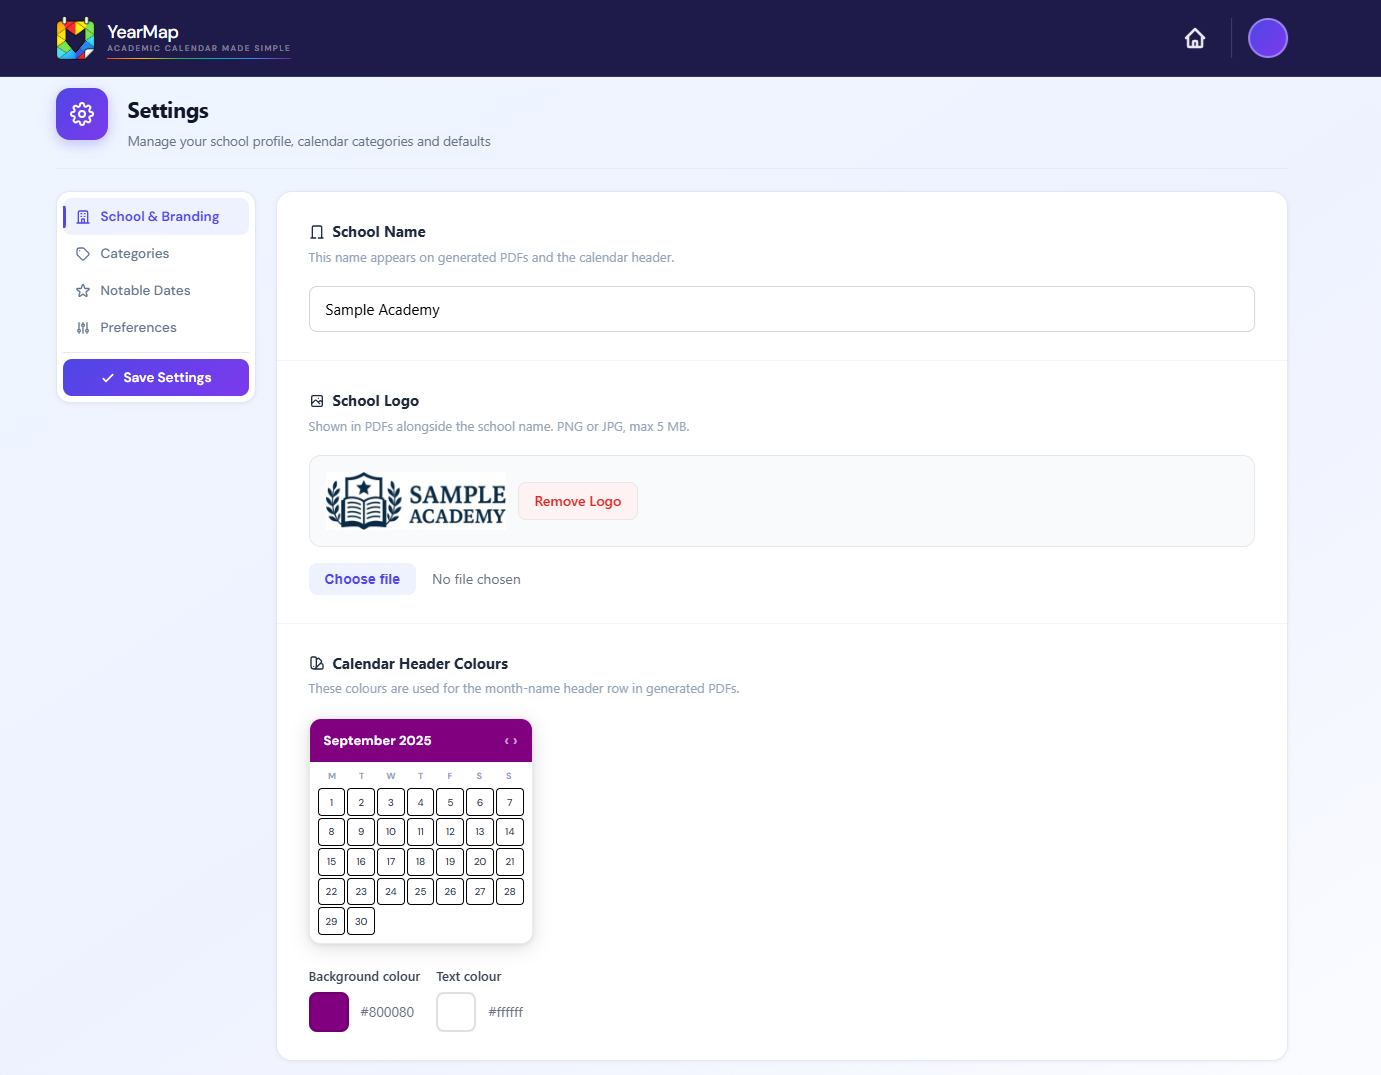
Before you can create a calendar, you need to complete your account settings. These defaults are used to pre-populate every new calendar you create. Navigate to Settings from the top navigation bar.
| Setting | Description | Required? |
|---|---|---|
| School Name | Appears as the calendar title and in the PDF header | Required |
| School Logo | PNG or JPG, max 500KB. Automatically cropped and resized for PDF output | Optional |
| Header Background Colour | Colour used for month headers in generated PDFs | Optional |
| Header Text Colour | Colour of text within PDF month headers | Optional |
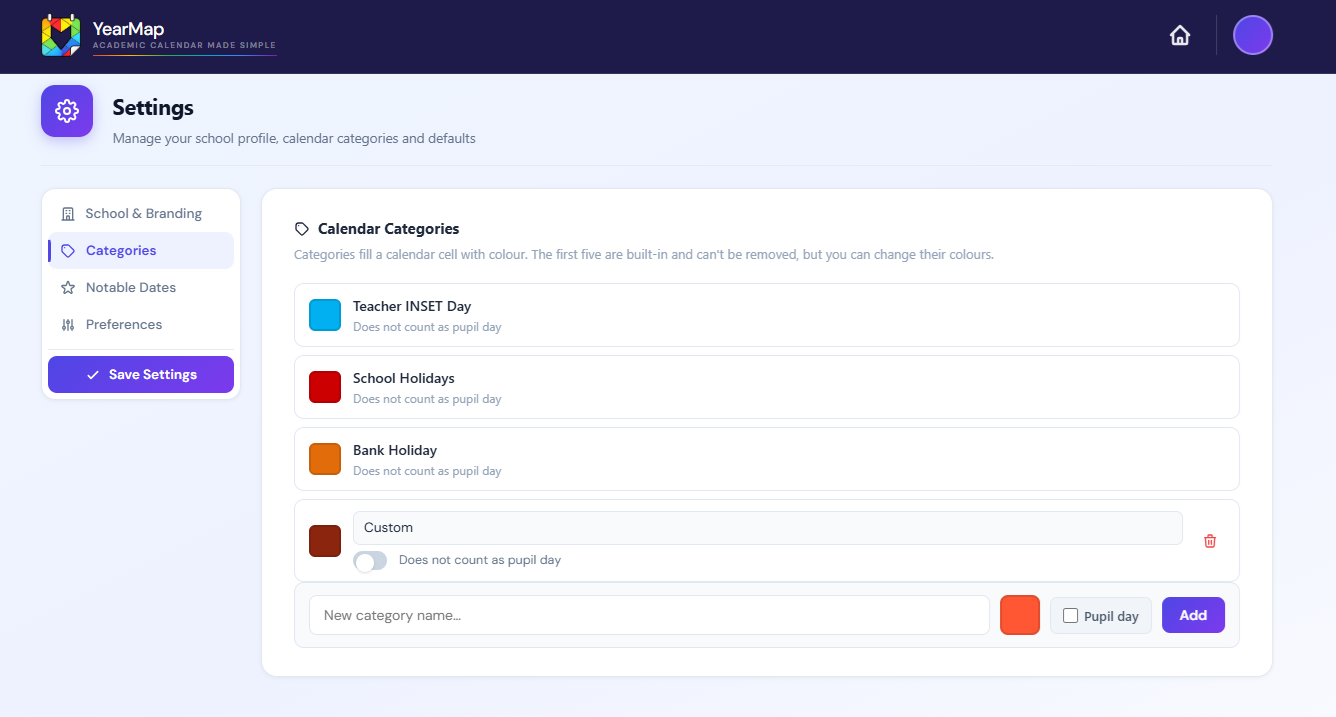
| Custom Categories | Add your own event categories on top of the five system-defined ones. Custom categories saved here are available across all new calendars you create. You can also add one-off categories directly within Step 3 of the wizard; those only apply to that specific calendar and do not appear in your account-wide defaults | Optional |
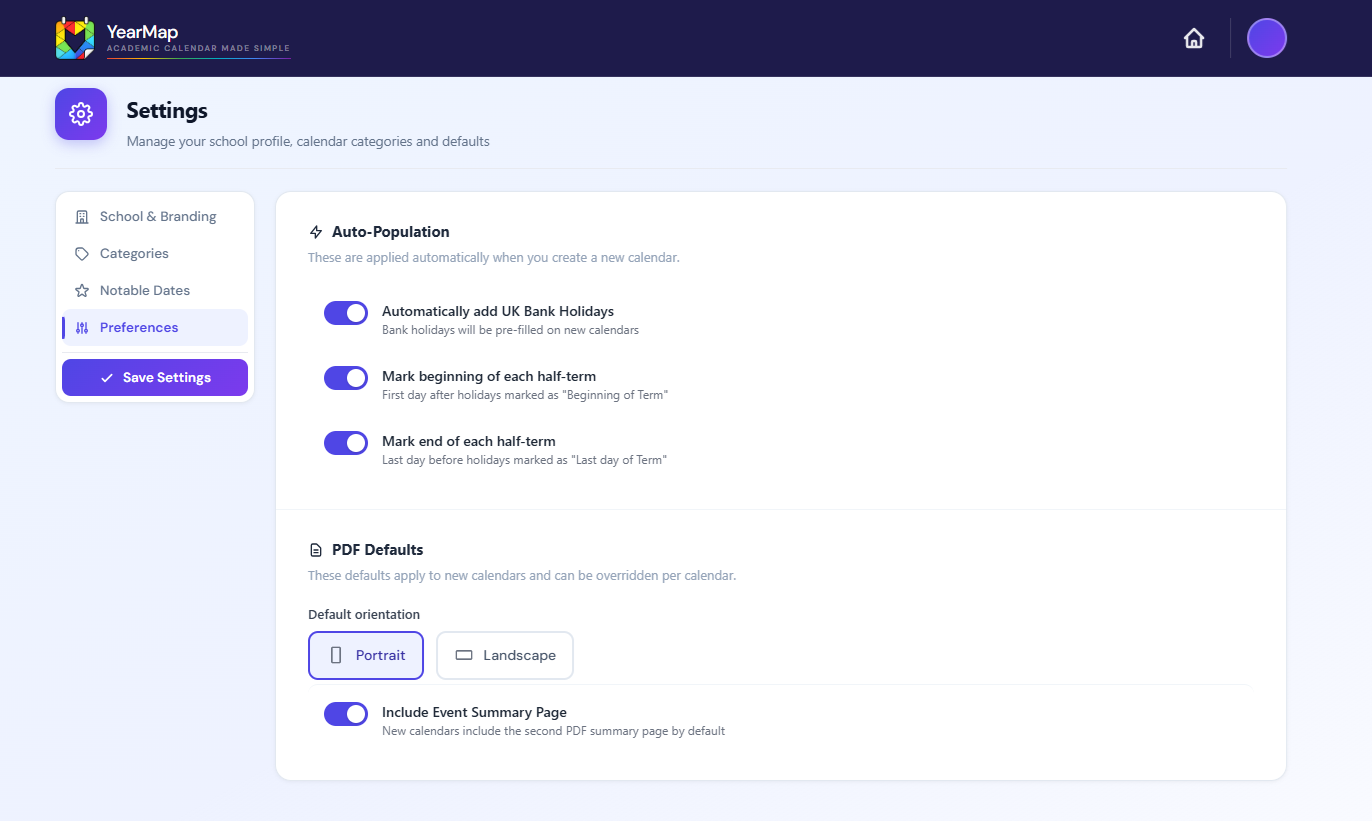
| Auto Bank Holidays | Automatically insert England & Wales bank holidays into new calendars. If you are based outside the UK, disable this and add your own public holidays manually in Step 4 of the wizard. This setting can be toggled on or off for any individual calendar in Step 3 without affecting the account default | Optional |
| Auto Term Boundaries | Two separate toggles that add boundary markers around school holiday entries. Mark beginning of each half-term marks the first pupil day after each holiday as "Beginning of Term". Mark end of each half-term marks the last pupil day before each holiday as "Last day of Term". Both settings can also be overridden per calendar in Step 3 | Optional |
| Default PDF Orientation | Portrait or landscape used as the starting point for all new calendars. You can override this for any individual calendar in Step 5 of the wizard without changing the account default | Optional |
| Include Event Summary Page | Sets whether a second page listing all events in date order is appended to generated PDFs by default. This can be toggled on or off per calendar in Step 5 of the wizard | Optional |
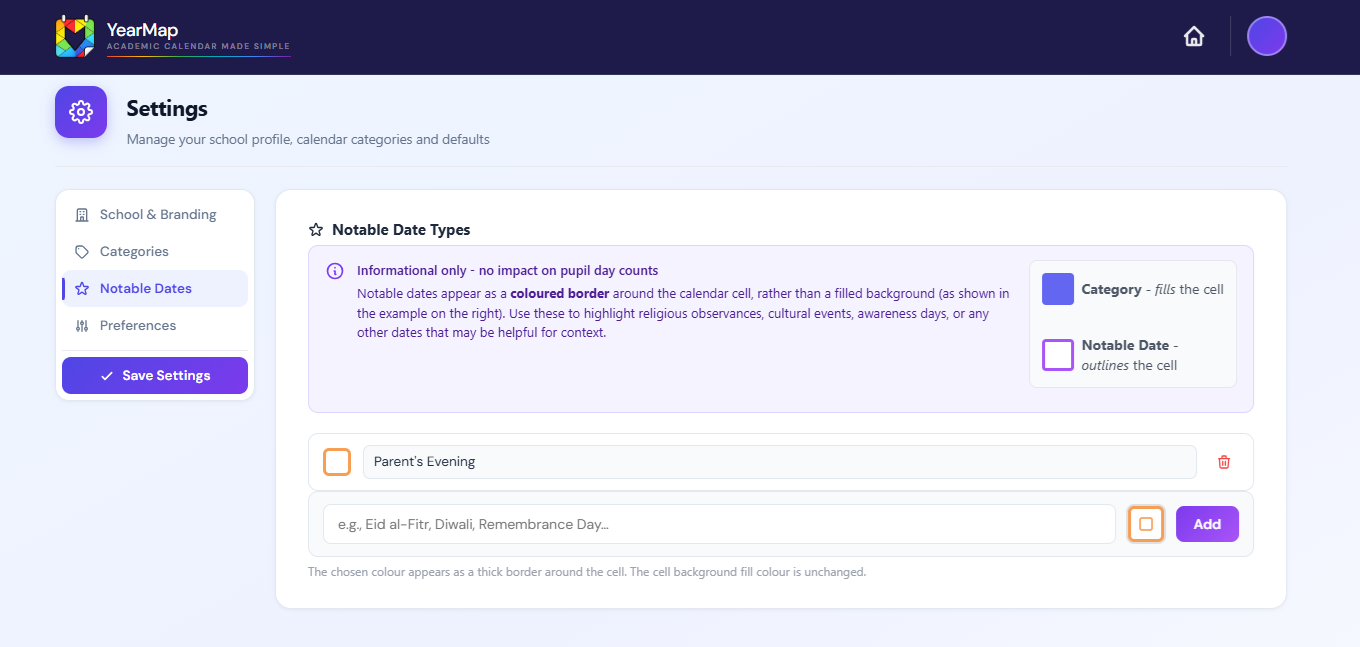
| Notable Date Types | Define named, colour-coded markers (e.g. "Parents' Evening", "Open Day") that can be applied to individual calendar cells as a coloured border ring. Unlike categories, notable date types have no effect on pupil day counts and do not appear in the category colour key. They must be configured here before they can be used in the wizard. There is no way to add one-off notable date types inside the wizard itself | Optional |
How to Manage Your School Calendars
Your calendar management home
After signing in you land on the Dashboard. This is where you manage all your calendars. It shows two tabs:
Calendars you own. You can edit, rename, share, clone, delete, and export these.
Calendars shared by colleagues. You can view, export, and (if permitted) edit these.
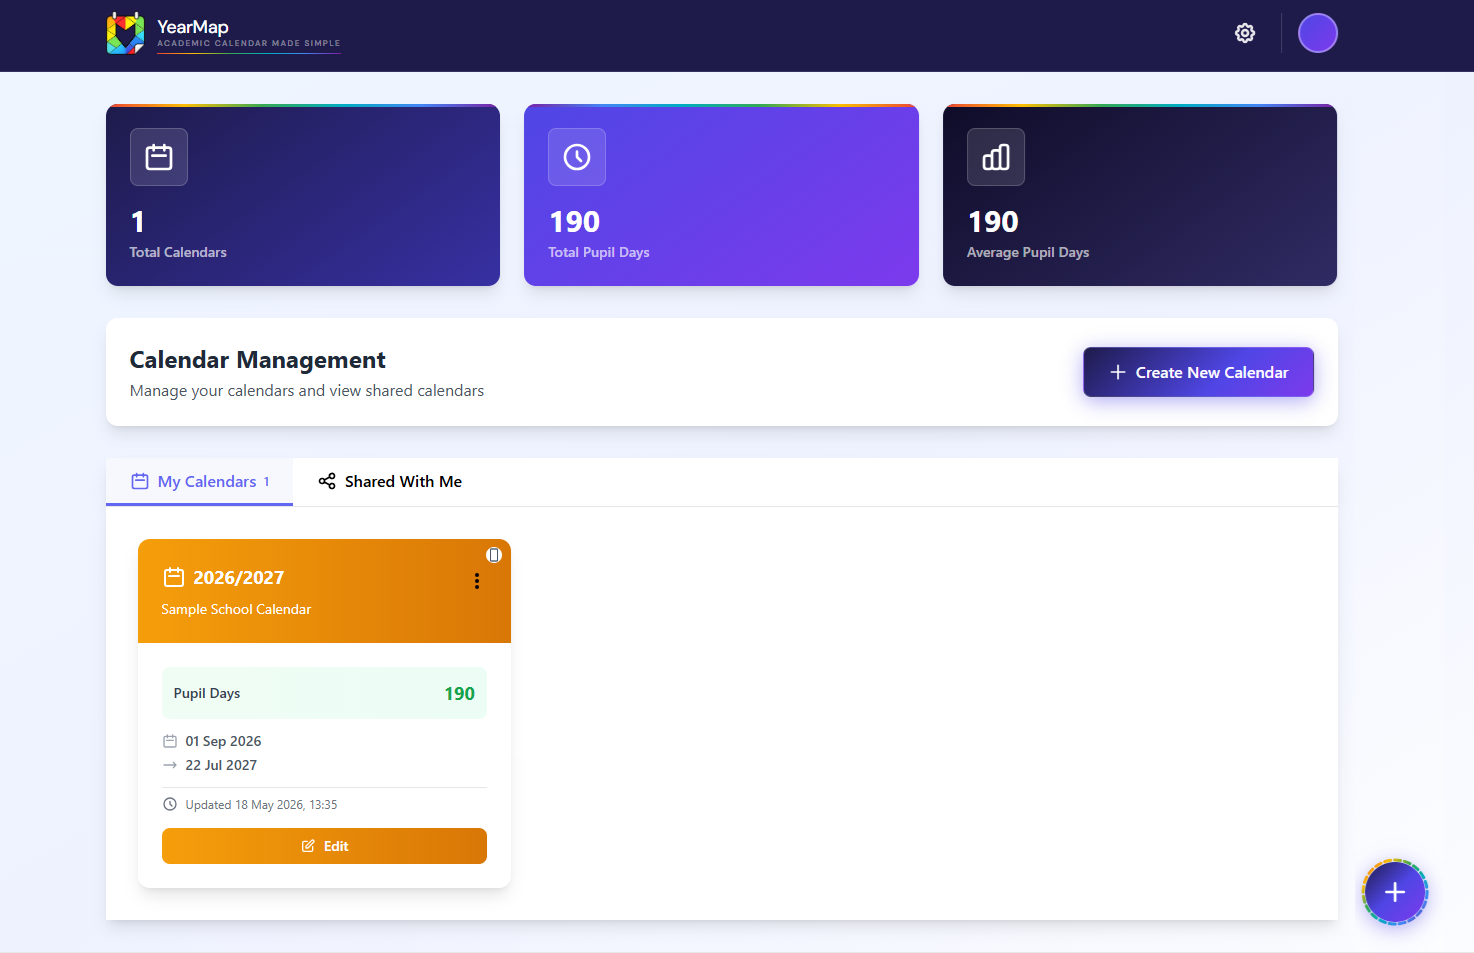
The top of the dashboard shows summary statistics for your own calendars: total calendars, total pupil days across all calendars, and your average pupil days per calendar.
Creating a Calendar
Start the wizard to build your academic calendar
To create a new calendar, click the + Create New Calendar button on the dashboard. This opens the five-step calendar wizard.
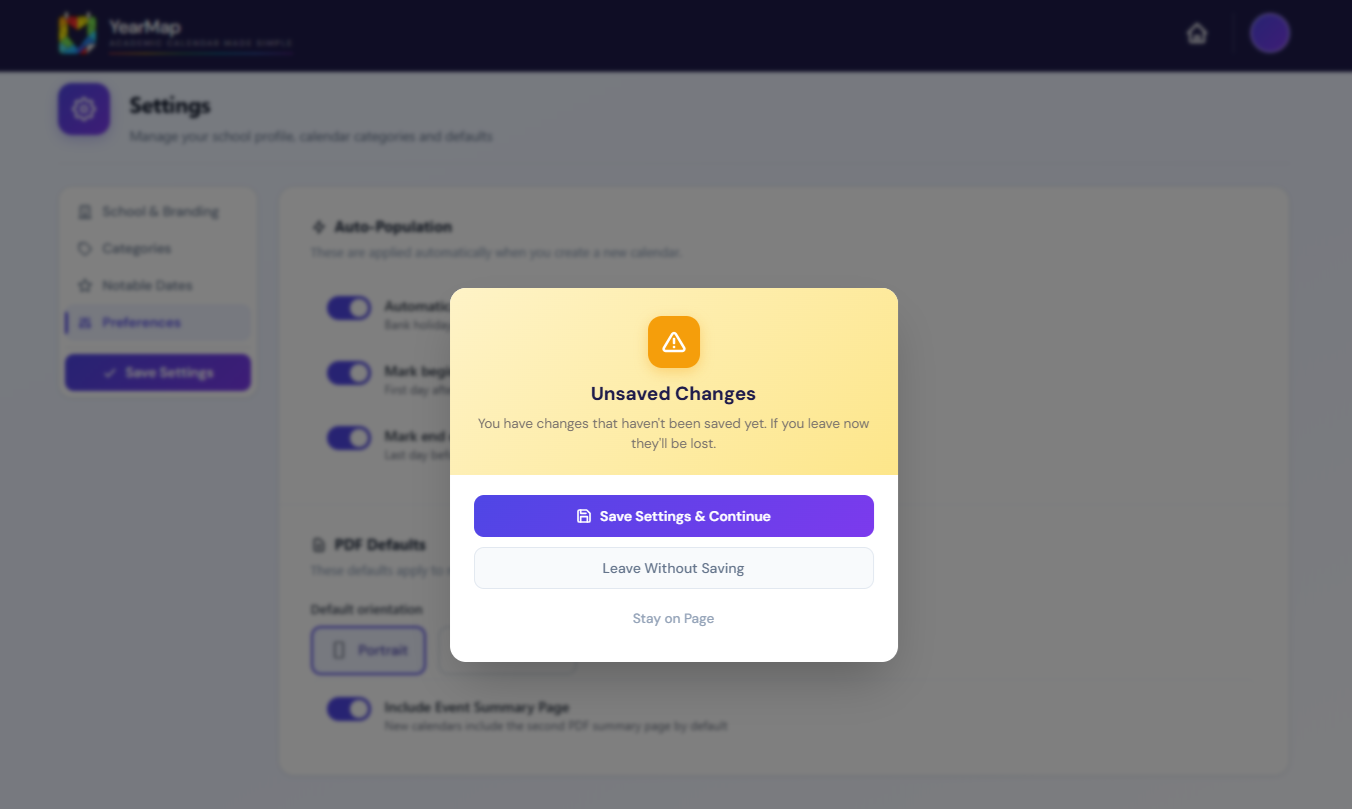
Your calendar is saved automatically as you progress through the wizard. Auto-save activates from Step 2 onwards once an academic year has been entered. Changes made on Step 1 alone are not saved until you advance. A stable filename is assigned on first save and all subsequent auto-saves update the same file.
How to Create a School Calendar Step by Step
A breakdown of each step in the calendar builder
Think of building a calendar in four simple stages.
Stage 1 (Step 1): Tell YearMap the academic year and its overall start and end dates.
Stage 2 (Step 2): Enter the start and end dates for each of your three terms. YearMap will automatically fill in the holiday gaps between the terms (e.g. Christmas and Easter) because it can work out from the dates you enter exactly when those gaps fall.
Stage 3 (Step 3): Check your categories and settings. In most cases you can skip straight through this step, especially if you have already set up your custom categories and preferences in Account Settings. Bank holidays are also inserted automatically here if that option is enabled.
Stage 4 (Step 4): Add the half-term holidays, one in the middle of each term (three half-terms in total across the year). These are added using the School Holidays category. If your school has any other closures (a one-off closure day, a local holiday, etc.), those must be added using a custom category, not School Holidays. See the guidance below for why this matters.
Once you save these dates, YearMap automatically inserts the holiday periods between the terms, meaning the Christmas holiday (the gap between autumn end and spring start) and the Easter holiday (the gap between spring end and summer start) using the School Holidays category. You do not need to enter these yourself. YearMap knows the holidays from the gaps you have defined.
YearMap suggests common UK term dates to help you get started. If you are outside the UK, simply enter your own term dates instead. All dates must be weekdays.
If you need a one-off category that only applies to this specific calendar (and you don't want it cluttering your account defaults), you can add it here, but for most users this step is just a review screen and you can click straight through.
If Auto Bank Holidays is enabled, England and Wales bank holidays are automatically inserted at this step. The Auto Bank Holidays and Auto Term Boundary settings shown here default to your account preferences but can be toggled for this calendar independently.
The most important thing to do at this step is add your three half-term holidays, one per term (autumn half-term, spring half-term, and summer half-term). Select the date range for each half-term break and assign it to the School Holidays category. These are the mid-term breaks that split each term roughly in two.
Important: The School Holidays category is intentionally limited to one entry per term. This is because YearMap uses the School Holidays entries as reference points to automatically place the "Last day of Term" and "Beginning of Term" boundary markers correctly. If you try to add a second School Holidays range inside the same term, the system will show an alert explaining that only one half-term holiday per term is expected, and ask you to use a custom category for any additional closures.
For any other school closures within a term (an extra closure day, a local public holiday not covered by the auto bank holidays, a one-off event), use a custom a custom category (e.g. "Additional Closure" or "Local Holiday") in Step 3 and use that instead of School Holidays. Those custom entries will not be mistaken for half-term boundaries and will not trigger the limit.
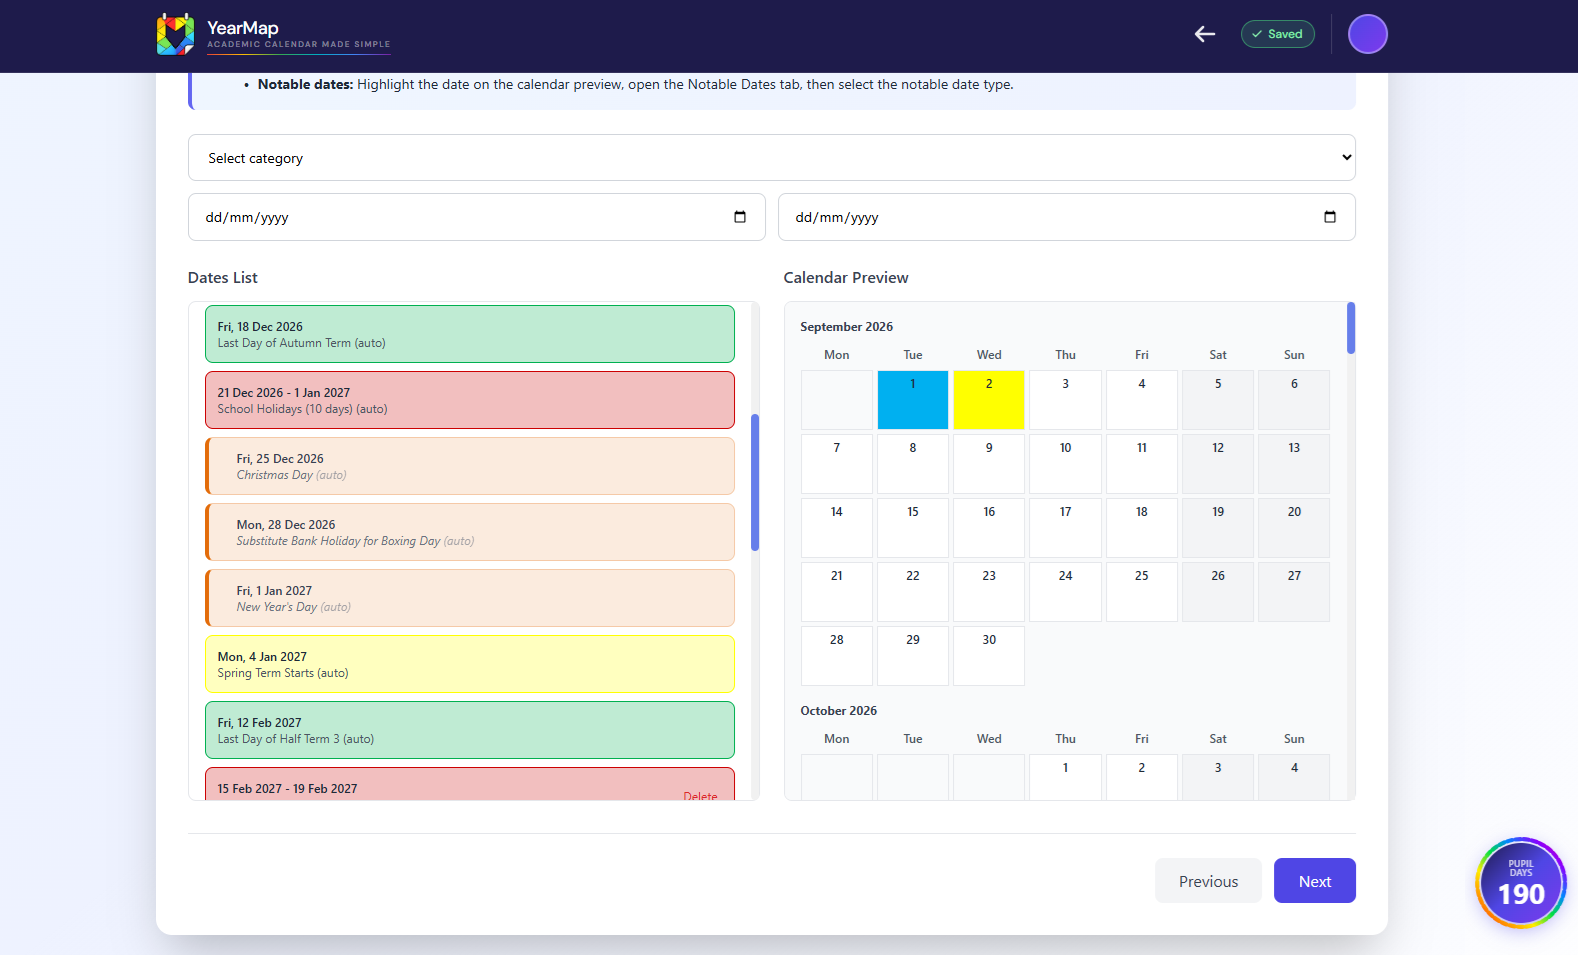
Either method (date form or calendar drag) opens a Mark Date modal with two tabs: the Categories tab assigns a category to the selected date(s) and affects pupil day counts; the Notable Dates tab applies a coloured border ring to the cell without affecting counts or categories. A date can carry both a category and a notable date marker at the same time.
Categories & Dates
Understanding event categories and how dates are assigned
Categories define the type of event for each date. Each category has a name, a colour used in the calendar preview and PDF, and an Is Pupil Day flag that determines whether dates in that category count toward the pupil day total.
System categories
Five categories are defined by the system and are always available in every calendar. Their names and core behaviour are fixed and cannot be removed or renamed. A category only appears in the calendar output and PDF colour key if at least one event has been assigned to it, so you can have categories available without them showing up if they are not used.
| Category | Default Colour | Pupil Day? |
|---|---|---|
| Teacher INSET Day | #00B0F0 | No |
| School Holidays | #CC0001 | No |
| Beginning of Term | #FFFF00 | Yes |
| Last day of Term | #00B050 | Yes |
| Bank Holiday | #E36C0A | No |
Custom categories
You can add your own categories in two ways. Categories added in your account Settings are saved as your defaults and will be available in every new calendar you create. Categories added during Step 3 of the wizard apply only to that specific calendar and are not saved back to your account defaults. This makes it easy to add a one-off event type for a single calendar without cluttering your standard setup.
When assigning dates, a date cannot belong to both a pupil-day category and a non-pupil-day category simultaneously. If a conflict with an auto-generated entry is detected, the auto-generated entry is removed and term boundaries are recalculated automatically.
Half-term holidays and the School Holidays category: what you need to know
The School Holidays category has a special role: it is the signal YearMap uses to place the Last day of Term and Beginning of Term boundary markers automatically. For this to work correctly, YearMap expects exactly one School Holidays entry per term: the mid-term half-term break.
Over a full academic year you will therefore add three half-term holidays in total, one inside each of the three terms, using the School Holidays category:
The note about the inter-term holidays (Christmas and Easter) is also worth keeping in mind: those are automatically filled in by YearMap from the gaps you enter in Step 2, so you do not need to add them manually either. The only School Holidays entries you need to add yourself are the three mid-term half-term breaks described above.
The Mark Date modal
Clicking or completing a drag on the calendar preview opens the Mark Date modal. It contains two tabs:
Assign the selected date(s) to a category. This affects the pupil day total and the colour coding on the calendar and PDF.
Apply a coloured border ring to the cell from your configured notable date types. No effect on pupil days or categories. A date can carry both a category and a notable date marker simultaneously.
Deleting dates from the list
The dates list in Step 4 shows all assigned dates and ranges with a Delete button beside each entry. Auto-generated entries, such as bank holidays inserted by the Auto Bank Holidays setting and term boundary markers, do not have a delete button and cannot be removed individually from the list. To remove them, toggle the relevant setting off in Step 3.
How to Calculate Pupil Days
How YearMap calculates the pupil day count
YearMap automatically calculates pupil days based on term dates, holidays and closures. This helps schools ensure they meet required teaching day counts.
The pupil day count is calculated by iterating over every weekday within your academic year's start and end dates, then subtracting any dates assigned to a non-pupil-day category (such as School Holidays, Bank Holidays, or INSET Days).
The pupil day total updates in real time as you assign and remove dates in the wizard. A floating counter badge appears at the bottom-right of the screen from Step 3 onwards, keeping the current count visible as you work. The final count is shown prominently in the Review step and is printed on the generated PDF.
How to Share a School Calendar with Staff
Collaborate with colleagues at your institution
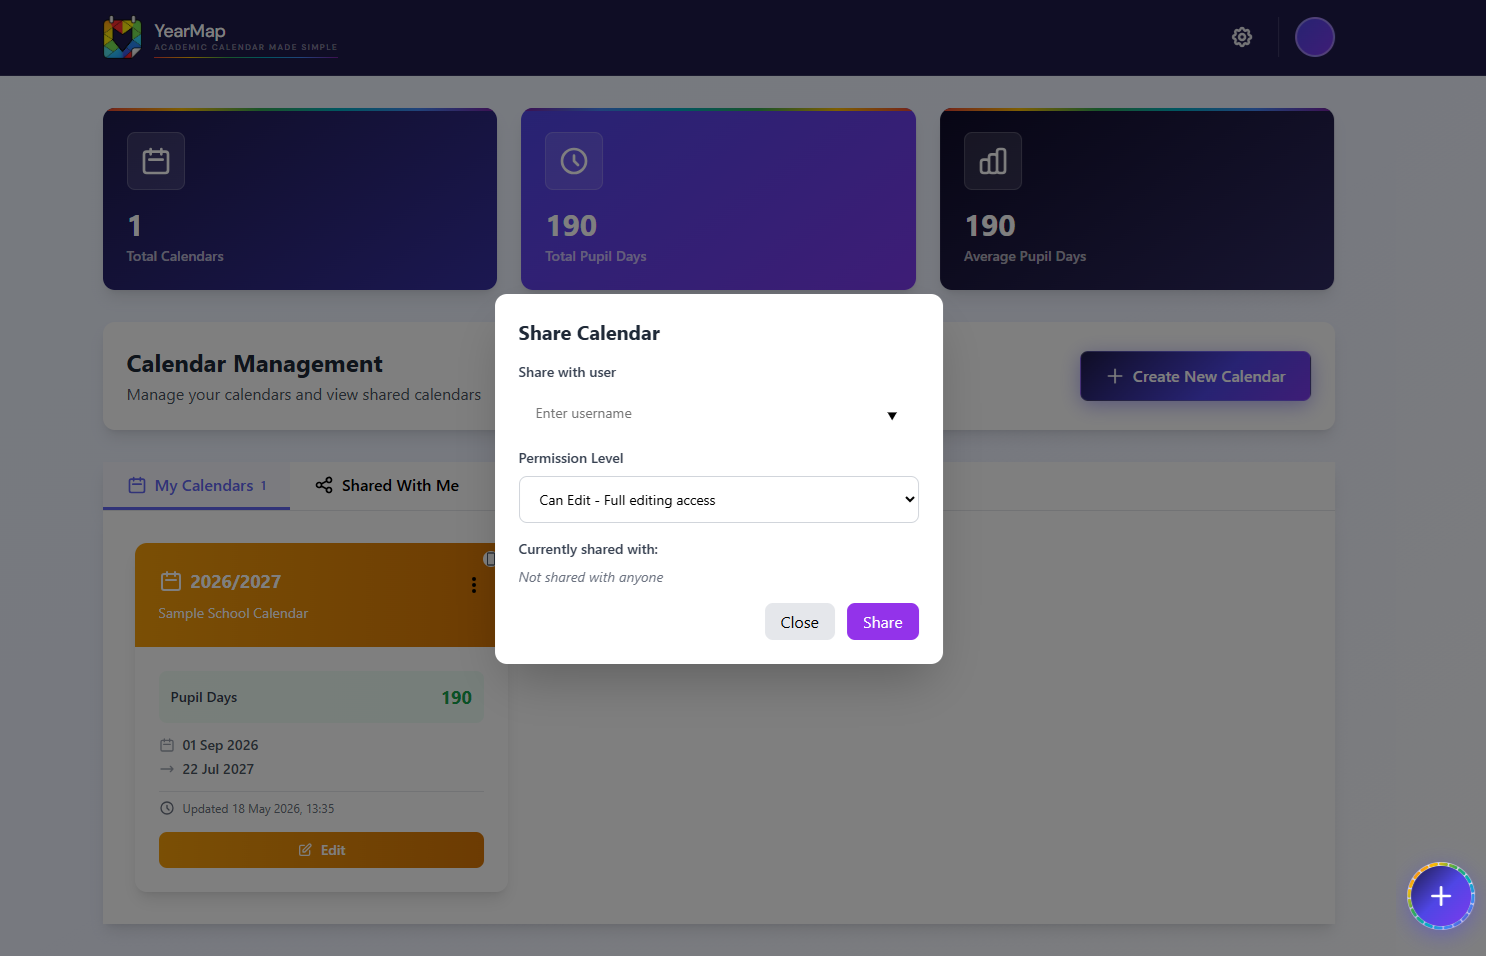
You can share any calendar you own with other users at the same institution domain. Shared calendars appear in the recipient's Shared With Me tab on their dashboard.
Permission Levels
What each permission level allows
| Permission | What the user can do | What the user cannot do |
|---|---|---|
| Can View | Open and inspect the calendar; export PDF and ICS; clone a copy to their own account | Open the editor; save any changes to the original |
| Can Edit | Open the full editor; save changes back to the owner's original file; generate new PDF and ICS; export; clone | Change ownership; delete the calendar; manage sharing settings |
Revoking Access
Removing a colleague's access to a shared calendar
You can remove a shared user at any time. Open the Share panel for the calendar, find the user in the Currently shared with list, and click Remove.
Access is removed immediately. Any subsequent attempt by the removed user to edit, generate, or export the calendar will be rejected. Their Shared With Me tab will no longer show the calendar after their next dashboard refresh.
Colleagues can also remove themselves from a shared calendar using the Leave option in their Shared With Me tab.
How to Export a School Calendar to PDF
Generating a printable academic calendar
Click the PDF button on any calendar card, or complete Step 5 of the wizard to generate a PDF. The generated PDF includes:
- Your school name and logo (if uploaded)
- Academic year title
- Monthly calendar grid with colour-coded date entries
- Term summary for autumn, spring, and summer terms
- Category colour key
- Total pupil day count
- Provisional next-year start date (if entered)
- Optional custom notes
- Optional event summary page listing all events in date order (appended as a second page when enabled)
How to Export a School Calendar to Outlook or Google Calendar
Importing your academic calendar into Google Calendar, Outlook, your school website CMS, and more
The ICS file is generated at the same time as the PDF. It is a standard iCalendar file compatible with Google Calendar, Microsoft Outlook, Apple Calendar, and most other calendar applications.
Each event in the ICS file corresponds to a date entry in your calendar. Date ranges assigned to the same category are grouped into multi-day events. Bank holidays use their official name as the event title.
To download the ICS file, click the ICS button on the calendar card from your dashboard.
Notable Dates
Highlighting individual dates without affecting pupil day counts
Notable dates let you mark individual calendar cells with a coloured border ring, a visual highlight that sits on top of any existing category colour. They are separate from categories: applying a notable date marker to a cell has no effect on pupil day calculations, the category colour key, or the PDF colour legend.
Setting up notable date types
Notable date types are configured in Account Settings before you use them in a calendar. Each type has a name and a colour. Common examples might be "Parents' Evening", "Open Day", or "Governors' Meeting". Unlike custom categories, notable date types cannot be added as one-offs inside the wizard. They must exist in your Settings first. Types defined in Settings are automatically available in every new calendar you create.
Applying notable dates in the wizard
Notable dates in the Review step
If any notable date markers have been applied, the Review step (Step 5) displays a Notable Dates summary panel alongside the holiday breakdown. It lists each notable date type used and how many dates have been marked with it.
Using YearMap Outside the UK
Notes for schools based outside England and Wales
YearMap has been developed and optimised for UK schools. The system reflects the UK educational structure: a three-term academic year (autumn, spring, and summer), automatic propagation of England and Wales bank holidays, and pupil day calculations based on standard UK conventions.
That said, YearMap does not restrict access based on location. Any school that authenticates with a valid organisation domain email is welcome to use the system. If your country operates on a similar three-term model, you should find YearMap works well with minimal adjustment.